

Where Is The Drawing Toolbar In Word
The Drawing toolbar has tools to add text boxes, lines, arrows, boxes, circles, and predefined shapes to your document. Many of these drawing objects can be formatted; that is, you tin can increase line thickness and color, alter font colors, and change groundwork colors and patterns. A drawing canvas is provided equally a work area for complex drawings; all the same, when inserting and formatting unproblematic drawing objects, it is more convenient to plow the drawing sail off.
Action iii.5. Inserting a Text Box
A text box is a movable, resizable container for text or graphics. A text box is useful to requite text a different orientation from other text in the certificate because a text box tin be placed anywhere in the document, just similar a floating paradigm. A text box is a drawing object and, every bit such, tin exist placed outside the document margin, resized, and moved. This is easier if y'all first plow off the drawing canvas. Every bit you progress in your study of Discussion, you volition learn more well-nigh using the drawing canvas.
| i. | From the Tools menu, click Options, then click the General tab. |
| ii. | Under General options, locate the Automatically create cartoon canvass when inserting AutoShapes check box and, if necessary, clearclick to remove the check markthe cheque box. Click OK to shut the Options dialog box and turn off the drawing canvas. |
| 3. | Check to see if the Drawing toolbar is displayed at the bottom of your screen. If information technology is non, on the Standard toolbar, click the Drawing button |
| 4. | Position your document so the bulleted list is well-nigh the top of your screen. On the Drawing toolbar, click the Text Box button Effigy iii.sixteen. 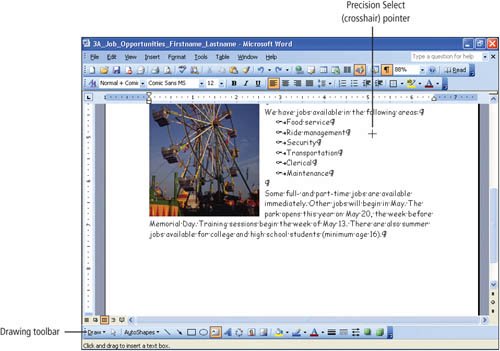 |
| v. | Position the A text box displays with the insertion point in the upper left corner, and the Text Box toolbar displays floating on your screen. |
| 6. | Blazon The SuperSpeed Ferris Wheel, 1 of the new rides at Sensation! Park so Save Figure three.17. |
 .
. , and and so motion the pointer into the document window to brandish the Precision Select
  pointeralso called the crosshair pointeras shown in Figure 3.16.
 your document. Notice how the text wraps inside the text box. Compare your screen with Figure three.17.
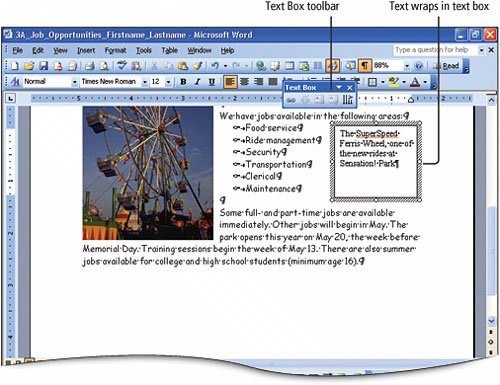
Activeness 3.6. Moving and Resizing a Text Box
| 1. | Bespeak to one of the borders of the text box until the Move pointer Figure 3.18. 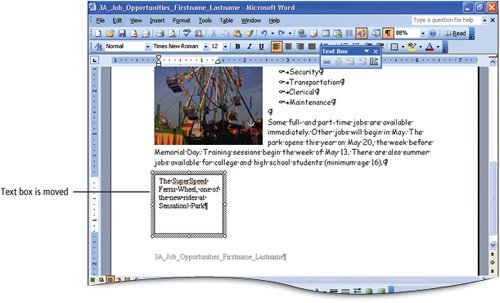 |
| | |
| ii. | Scroll downwardly until you can see the entire text box. If necessary, position the arrow over the center right sizing handle to display the Horizontal Resize pointer |
| iii. | On the Formatting toolbar, click the Center button Figure 3.19. 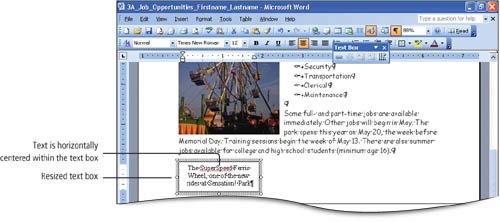 |
 displays. Drag the text box downwardly to the empty area beneath the paragraph beginning Some total- and part-time. Think that you can hold down
  and use the directional arrow keys to more precisely drive your object into position. Compare your screen with Figure 3.18.
 and and so drag to the right to suit the text box size until all the text in the box displays on iii lines. Drag the lower center handle up to remove excess white space in the text box.
 to center the text within the text box, Save
 Activity 3.7. Inserting an Pointer
Buttons on the Cartoon toolbar enable you to create shapescircles, boxes, lines, and arrows. Arrows are useful to point out features in graphic objects such equally photographs and maps.
| one. | Reposition the Ferris bike equally necessary so the text wraps every bit shown in Figure 3.20. On the Drawing toolbar, click the Arrow push Figure 3.xx. (This particular is displayed on folio 424 in the impress version) 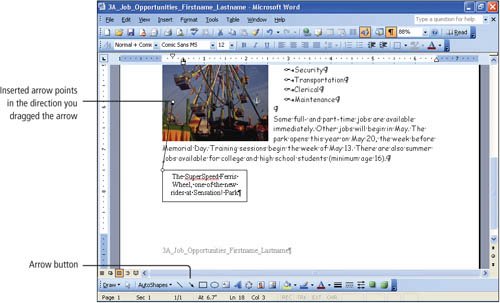 Warning!: Does a Large Drawing Box Display? If you did non deactivate the cartoon sheet, clicking buttons on the Drawing toolbar activates the cartoon canvasa work surface area for creating drawings. This work area is useful for combining several graphic objects, merely gets in the way when y'all desire to add simple shapes to a document. To turn off the drawing canvas, click the Close push on the Cartoon Canvas toolbar and click in the drawing canvass area. To deactivate the drawing canvas, from the Tools bill of fare, click Options, click the General tab, and then clear the Automatically create drawing sheet when inserting AutoShapes check box. |
| | |
| 2. | Position the NoteDrawing a Horizontal or Vertical Line If you want to draw an arrow or line that is perfectly horizontal or vertical, hold down |
| 3. | Motion the arrow over the selected arrow and correct-click. From the shortcut menu, click Format AutoShape, and so in the displayed Format AutoShape dialog box, click the Colors and Lines tab. |
| 4. | Nether Line, click the Weight spin box up arrow three times to select 1.5 pt. Nether Arrows, click the End size arrow, and so from the displayed menu, click the largest arrowheadArrow R Size 9. |
| five. | In the Format AutoShape dialog box, click the Layout tab. Under Wrapping style, click Tight. |
| 6. | Click OK to increase the line thickness and arrowhead size and movement the text away from the arrow. Compare your dialog box with Effigy three.21. Salve Figure 3.21. 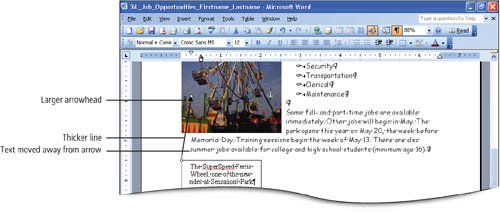 |
 , and then move your
  before yous elevate to create the arrow or line.
Action three.eight. Inserting an AutoShape
AutoShapes are predefined drawing shapessuch every bit stars, banners, arrows, and calloutsthat tin can be inserted in a document. More than 150 predefined AutoShapes are available with Discussion.
| ane. | On the Cartoon toolbar, click the AutoShapes button Effigy 3.22. 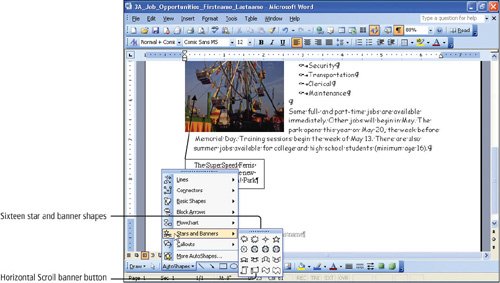 |
| | |
| 2. | In the fourth row of the Stars and Banners menu, click the second shapethe Horizontal Scroll imprint push |
| 3. | Position the Effigy 3.23.  |
| 4. | Move the pointer over the imprint and right-click. From the shortcut bill of fare, click Add Text. The insertion point is placed in the banner, and a slashed edge surrounds the shape. |
| 5. | Type Phone call 215.555.1776 and so select the text you just typed. From the Formatting toolbar, change the Font Size to 28, apply Bold |
| vi. | With the banner withal selected, on the Drawing toolbar, click the Fill up Colour arrow Figure 3.24. 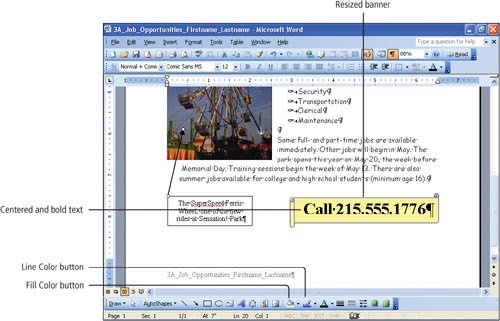 |
| 7. | Save |
| 8. | On the Print Preview toolbar, click the Print push |
| 9. | Close your document, saving whatsoever changes. From the View carte du jour, point to Toolbars, and so click Drawing to turn off the display of the Drawing toolbar. Close Word. |
 . Point to the Stars and Banners button
  , and then compare your screen with Figure 3.22.
 and and so move your
  , so Center
  . From the displayed color palette, in the fifth row, click the tertiary colorLight Yellow. Click the Line Color arrow
  , and and so from the displayed color palette, in the 2nd row, click the 6th colorBlue. Click exterior the banner to deselect it, and so compare your screen with Figure 3.24.
 to check your document. Bank check your Chapter Consignment Canvas or Course Syllabus, or consult your instructor, to decide if you are to submit your assignments on paper or electronically using your college's course data management system. To submit electronically, go to Step 9, and and so follow the instructions provided by your instructor.
 .
.| End | Yous take completed Project 3A |
Project 3B Park Changes

Source: https://flylib.com/books/en/2.406.1/objective_2_use_the_drawing_toolbar.html
Posted by: charltonthishatthe.blogspot.com
0 Response to "Where Is The Drawing Toolbar In Word"
Post a Comment